
Introduction to Pineapple Whip
When the craving for something sweet and refreshing hits, Pineapple Whip is the ultimate homemade treat to whip up! Inspired by the beloved Dole Whip you've likely enjoyed at Disney parks, this delightful dessert brings tropical vibes right into your kitchen. With just a handful of simple ingredients, it's a fun and easy way to impress family and friends or simply indulge in a little self-care.
Why Pineapple Whip is the Ultimate Homemade Treat?
One of the best features of this creamy delicacy is its customizability. Whether you prefer a dairy-free option or want to mix in additional flavors like coconut milk, the recipe can cater to your taste! Not only is it incredibly easy to make—taking about 25 minutes from start to finish—but it also packs a nutritious punch with low calories and high vitamin content, making it a guilt-free dessert choice.
Moreover, there’s something undeniably satisfying about blending up frozen pineapple, orange juice, and a hint of maple syrup. This fruity, creamy goodness is perfect for warm days, and it brings to mind sunny beach vacations and blissful relaxation. If you've ever thought, “I wish I could enjoy that treat anytime,” now you can! Delve into the full recipe and bring that tropical escape home.
Ingredients for Pineapple Whip
Essential Ingredients for a Creamy Pineapple Whip
To create the delightful and refreshing pineapple whip, you only need a few essential ingredients that blend together to create a creamy treat! Here’s what you’ll need:
- 1 pound frozen pineapple: The star of the show! Frozen pineapple allows for a frosty, slushy texture without needing additional ice.
- ½ cup orange juice: Adds a sweet and tangy brightness that complements the pineapple perfectly.
- ½ cup almond or coconut milk: For creaminess. If you prefer a richer taste, full-fat canned coconut milk can lend a delicious tropical twist.
- 1 tablespoon maple syrup: Just a touch of sweetness to balance the flavors.
Note on Ingredient Flexibility
Don’t hesitate to tweak this recipe based on your preferences! For instance, if you're not a fan of coconut, stick with almond milk for a lighter version. You could also experiment with different fruit juices, such as guava or mango, to create a unique flavor profile. The beauty of making pineapple whip at home is you have the freedom to make it your own!
For more ideas about ingredient substitutions, check out resources like Food Network or Serious Eats.
Preparing Pineapple Whip
Creating a delicious pineapple whip is a delightful way to bring a touch of tropical paradise right to your kitchen! Whether you're reminiscing about a recent vacation or just craving a refreshing dessert, follow these simple steps to whip up a homemade treat that’ll have everyone begging for seconds.
Thaw the Frozen Pineapple
The first step in your pineapple whip adventure is to let the frozen pineapple thaw. Place a pound of frozen pineapple chunks on your countertop for about 20 minutes. This crucial step ensures that the pineapple softens slightly, which makes for easier blending and a creamier texture without diluting the flavor with excess liquid. As you wait, why not pour yourself a refreshing drink or take a moment to appreciate the tropical aromas filling your kitchen?
Gather Your Ingredients
While the pineapple is thawing, it’s time to gather the rest of your ingredients. You’ll need:
- ½ cup orange juice
- ½ cup almond or coconut milk (depending on your preference)
- 1 tablespoon maple syrup
These simple ingredients combine perfectly to create that iconic pineapple whip flavor. Feeling adventurous? Why not check out variations using different plant-based milks or sweeteners that can add unique twists to your whip?
Blend to Perfection
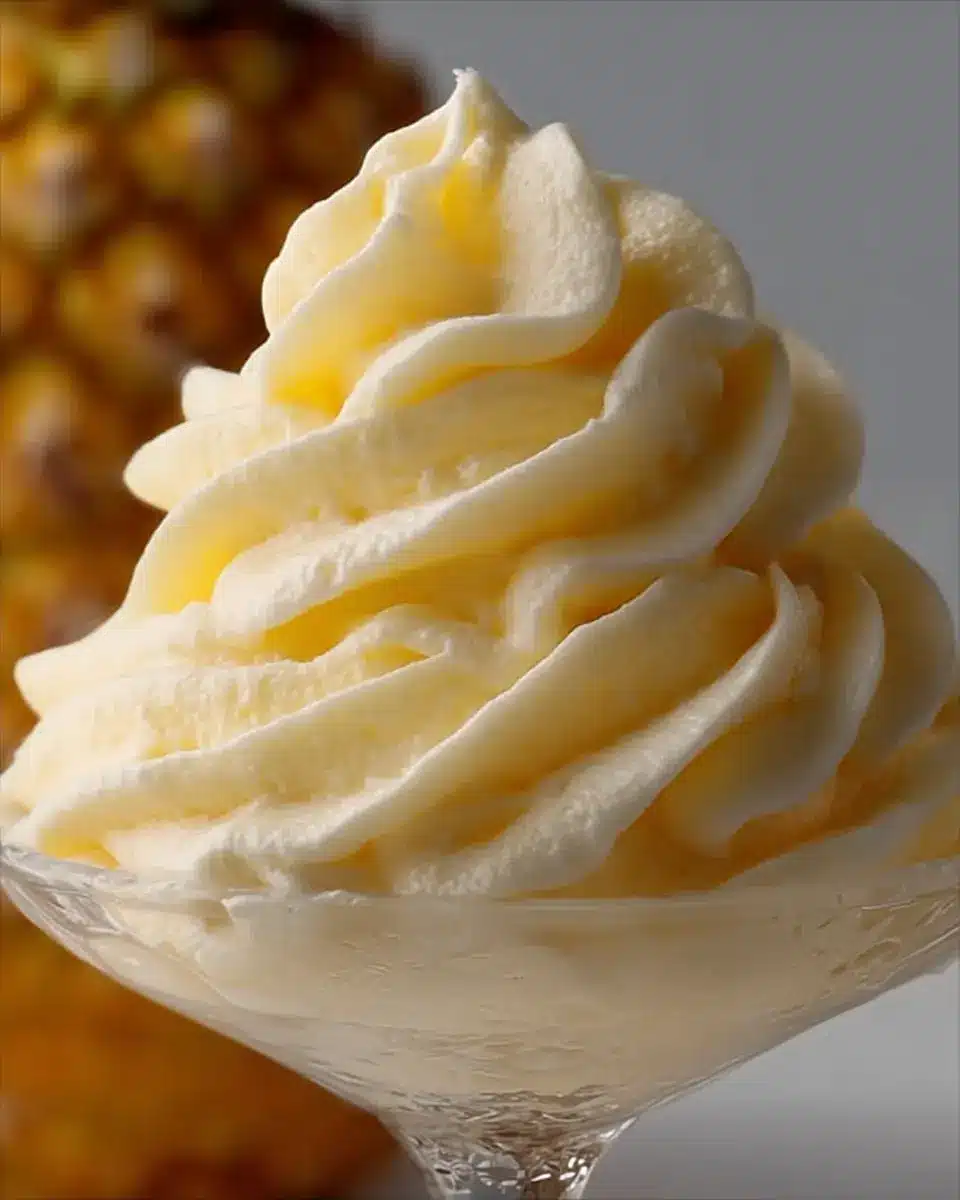
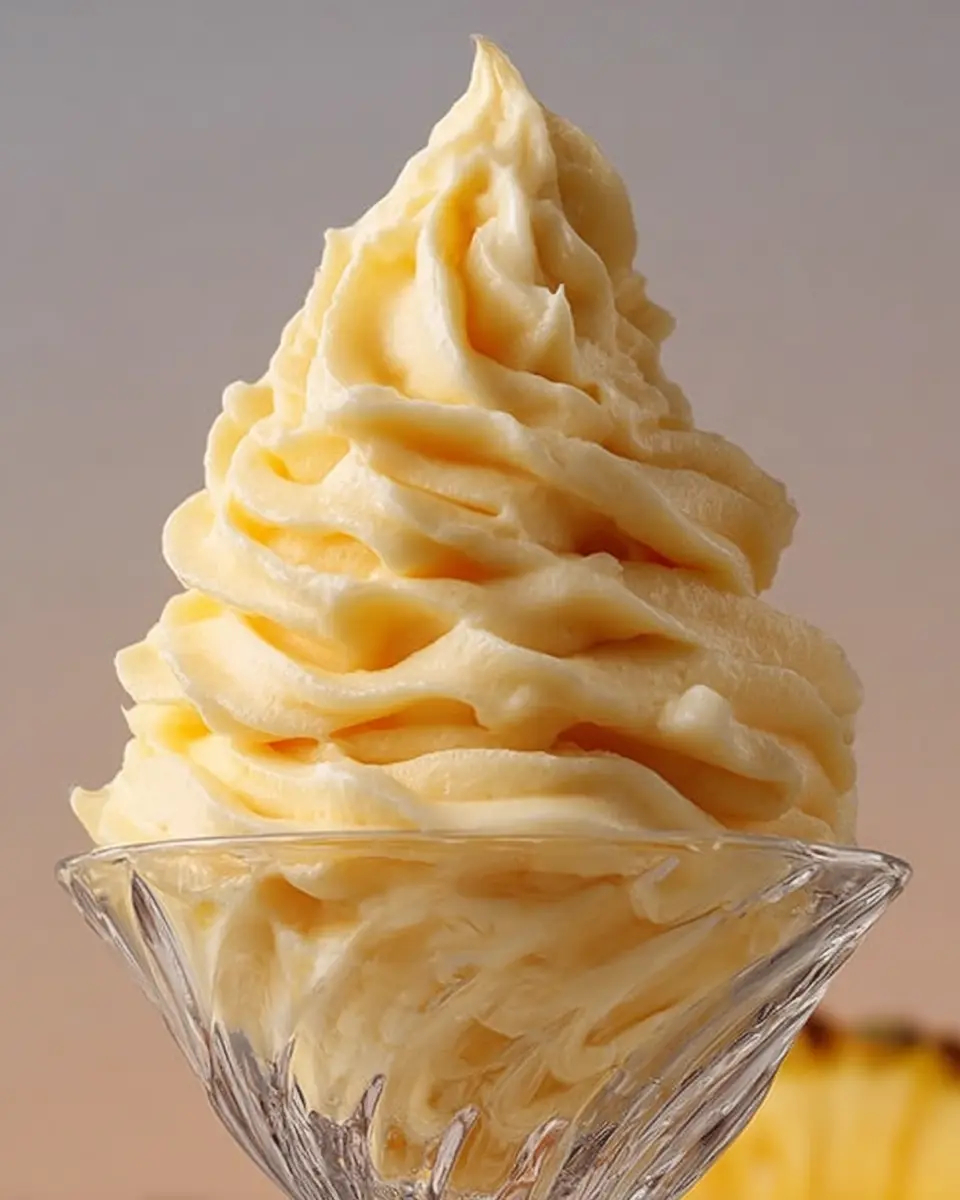
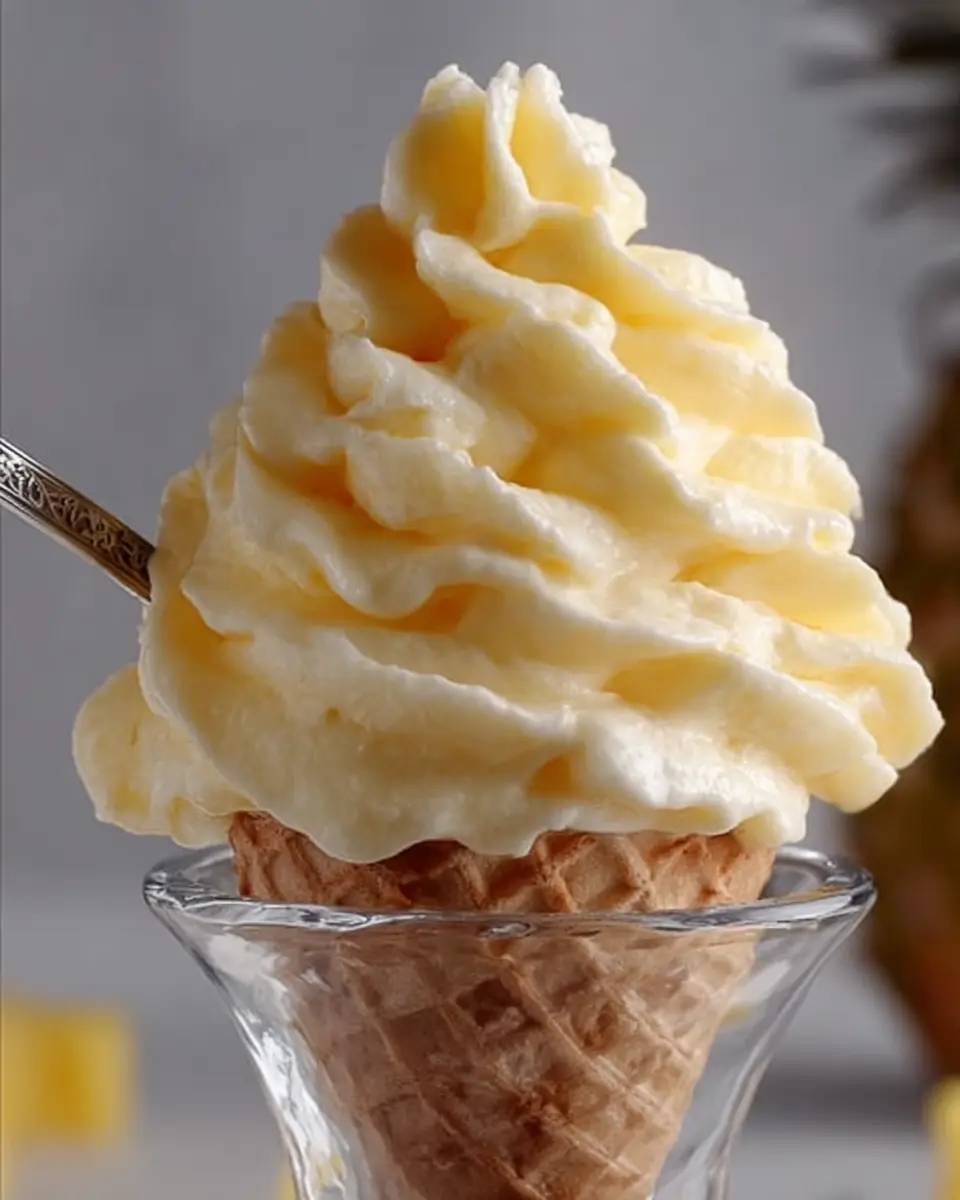
Once your pineapple is thawed, it’s time to blend! Place the soft pineapple in your blender along with the orange juice, almond or coconut milk, and maple syrup. Secure the lid and blend until everything is thick and creamy. If you have a tamper, use it to help break down the pineapple chunks. If not, simply pause occasionally to scrape down the sides of the blender and mix it all together. The goal is a smooth, dreamy consistency reminiscent of soft-serve ice cream!
Choose Your Serving Style
After you’ve achieved that velvety texture, it’s time to decide how you want to serve your pineapple whip. You can scoop it directly into bowls for immediate enjoyment. However, if you’re after a fun soft-serve style, transfer the mixture into a gallon-sized zipper bag, flatten it, seal, and place it in the freezer for about 30 minutes. This quick freeze helps it hold its shape when you’re ready to pipe it into your favorite serving dishes.
Optional Freezing Technique
If you find yourself with leftovers—or if you just want to prepare ahead—you can store your pineapple whip in the freezer. When it’s firm, knead the bag to ensure a thick and slushy texture. To serve again, simply let the bag thaw for 15-20 minutes before cutting off a corner and piping it back into bowls. This method keeps the flavors fresh and allows you to enjoy your pineapple whip whenever that craving hits again.
With these easy steps, you’re now ready to create your very own pineapple whip. Enjoy your tropical treat and let the good vibes roll!
Variations on Pineapple Whip
Tropical Coconut Pineapple Whip
For a deliciously creamy, beachy twist, try adding coconut milk to your pineapple whip. This version not only enhances the richness but infuses a tropical flavor that will transport you to sandy shores with every bite. Simply replace half of the almond or coconut milk in the original recipe with full-fat canned coconut milk. Trust me; it's a game-changer for summer gatherings or cozy nights on the couch.
Pineapple Whip with a Twist (Add Other Fruits)
Feeling adventurous? Why not play around with adding other fruits to your pineapple whip? Berries like strawberries and mangoes can elevate the taste and add beautiful color. Just toss in your favorite frozen fruit during blending, and enjoy a fun fruit medley! This not only enhances flavor diversity but also packs added nutrition into each scoop.
For more inspiration, you might explore other tropical treats or refreshing dessert ideas!
Tips and Notes for Pineapple Whip
Blending Tips for a Smoother Texture
To achieve that coveted smooth texture in your Pineapple Whip, try letting your frozen pineapple thaw for about 20 minutes before blending. This not only softens the pineapple but also allows for easier blending without needing to add excess liquid. If you have a tamper for your blender, use it! If not, don’t hesitate to scrape down the sides during blending for a uniformly creamy result.
Storage Recommendations for Leftovers
If you find yourself with extra pineapple whip, feel free to freeze it in a gallon-sized zipper bag. Aim to lay the bag as flat as possible for easy storage. When you're ready to enjoy again, simply thaw for 15 to 20 minutes on the counter. Knead the bag until it feels slushy, and you can serve it directly from there, just like fresh!
Serving Suggestions for Pineapple Whip
Perfect Pairings with Pineapple Whip
Looking for the perfect way to elevate your pineapple whip experience? Here are some delightful serving suggestions tailored to impress:
-
Tropical Smoothie Bowl: Serve your pineapple whip as a base for a smoothie bowl. Top it with granola, sliced bananas, and a sprinkle of shredded coconut for a refreshing breakfast or snack.
-
Fruity Parfait: Layer the whip between fresh fruits like strawberries and kiwi, adding a dollop of coconut yogurt for extra creaminess. It makes a beautiful, healthy dessert!
-
DIY Sundaes: Create a tropical sundae by adding toppings like toasted walnuts, mini chocolate chips, or a drizzle of honey. Your guests will love it!
These suggestions not only enhance the fun of pineapple whip, but they're also a hit at gatherings. Prepare to wow your friends with this sweet treat!
Time Breakdown for Pineapple Whip
Preparation Time
Getting your ingredients together is a breeze! You’ll need about 5 minutes to measure out everything.
Thawing Time
To create the perfect texture for your pineapple whip, allow the frozen pineapple to thaw on your counter for 20 minutes. This step is essential for blending!
Total Time
In just 25 minutes, you’ll have a delicious dessert ready to enjoy. Perfect for a quick treat or a warm day!
For a refreshing snack that tastes like a tropical getaway, check out this guide on the benefits of pineapple!
Nutritional Facts for Pineapple Whip
If you're craving a refreshing treat without the guilt, the pineapple whip is an excellent choice. Here’s a quick look at the nutrition in a ½ cup serving:
Calories
With only 59 calories per serving, this dessert is light yet satisfying, making it a fantastic option for a mid-day snack or a sweet indulgence.
Macronutrients Overview
- Carbohydrates: 14g
- Protein: 1g
- Fat: 0.4g
This pineapple whip is not only low in calories but also provides natural sugars and some dietary fiber from the fruit, helping you feel fuller for longer. Plus, with its delicious tropical flavor, it’s a treat you can enjoy without worry!
For more information on healthy desserts, consider checking out sources like Healthline and NutritionData.
FAQs about Pineapple Whip
Can I use fresh pineapple instead of frozen?
While you can use fresh pineapple for your pineapple whip, frozen pineapple gives it that creamy, slushy texture that we all crave. If using fresh, consider freezing it for a few hours beforehand to achieve the desired consistency. Keep in mind that fresh pineapple may also require a bit more orange juice to blend smoothly.
How long does Pineapple Whip last in the freezer?
Your delicious pineapple whip can last up to 3 months in the freezer. To keep it fresh, store it in a gallon-sized zipper bag, making sure to squeeze out excess air before sealing. This technique not only preserves the flavor but also allows for easy portion control later.
Are there any allergen considerations?
Yes, when preparing pineapple whip, it’s essential to consider allergies. The recipe includes almond or coconut milk, which can trigger allergies in some individuals. If you're serving guests or have allergies yourself, opt for alternative milks like oat or soy milk instead. Always double-check ingredient labels to ensure safety.
For more detailed allergen information, check resources like FDA Food Allergens.
Conclusion on Pineapple Whip
Why You Need to Try This Pineapple Whip Recipe Today
If you’ve been dreaming of the refreshing taste of a pineapple whip, now's your chance to indulge! This delightful dessert not only satisfies your sweet tooth but also keeps things simple with just four ingredients. Perfect for hot days, family gatherings, or simply a tasty treat at home, this recipe is a must-try. Enjoy creating this tropical delight anytime you need a little escape!
For more dessert inspiration, check out This Healthy Dessert Blog.

Pineapple Whip
Equipment
- Blender
Ingredients
- 1 pound frozen pineapple
- ½ cup orange juice
- ½ cup almond or coconut milk see notes
- 1 tablespoon maple syrup
Instructions
- Start by letting the bag of frozen pineapple thaw on the counter for 20 minutes. This will help the pineapple chunks break down easier, without adding too much liquid. You can measure the other ingredients and add them to the blender while you wait.
- Add the pineapple to the blender with the other ingredients, secure the lid, and blend until the mixture looks thick and creamy. Use a tamper to help the ingredients break down, if available. Otherwise, stop and scrape down the sides several times, until the mixture looks smooth.
- You can serve the pineapple whip right away by scooping it out of the blender into a dish. For a soft-serve presentation, transfer it to a gallon-sized zipper bag, flatten it as much as possible, and seal it. Place it in the freezer for 30 minutes to firm up for the best texture. (That way it won't melt too fast.)
- Once it's firm, knead the bag to make sure it's thick and slushy. Then, cut off one corner of the bag to create a piping bag. Pipe the pineapple whip into serving dishes and serve right away. If you have leftovers in the bag, seal the corner you cut off with a clip and freeze for up to 3 months.


Leave a Reply